Connect with us

Guide

How To Customize Galaxy Z Flip 5 Cover Screen

Published

on


Samsung has launched its next-gen foldable smartphone, the Samsung Galaxy Z Flip 5, in the Unpacked event held in its hometown. The foldable smartphone comes with a slew of exciting features and intuitive functionality. The most impressive feature that makes the Galaxy Z Flip 5 stand out is its high-end flexible Hinge design, making its body gapless. 

Despite offering many exciting features, Galaxy Z Flip 5 has come up with the most exciting upgrade ever with its massive cover screen, which is comparatively more extensive than its predecessor. Coming with a myriad of comprehensive features and enhancements, the feature that attracts Galaxy users the most is its highly customizable cover screen. Here’s how you can customize the cover screen of your Galaxy Z Flip 5 and unlock all of its potential. 

How to Customize Cover Screen of Galaxy Z Flip 5

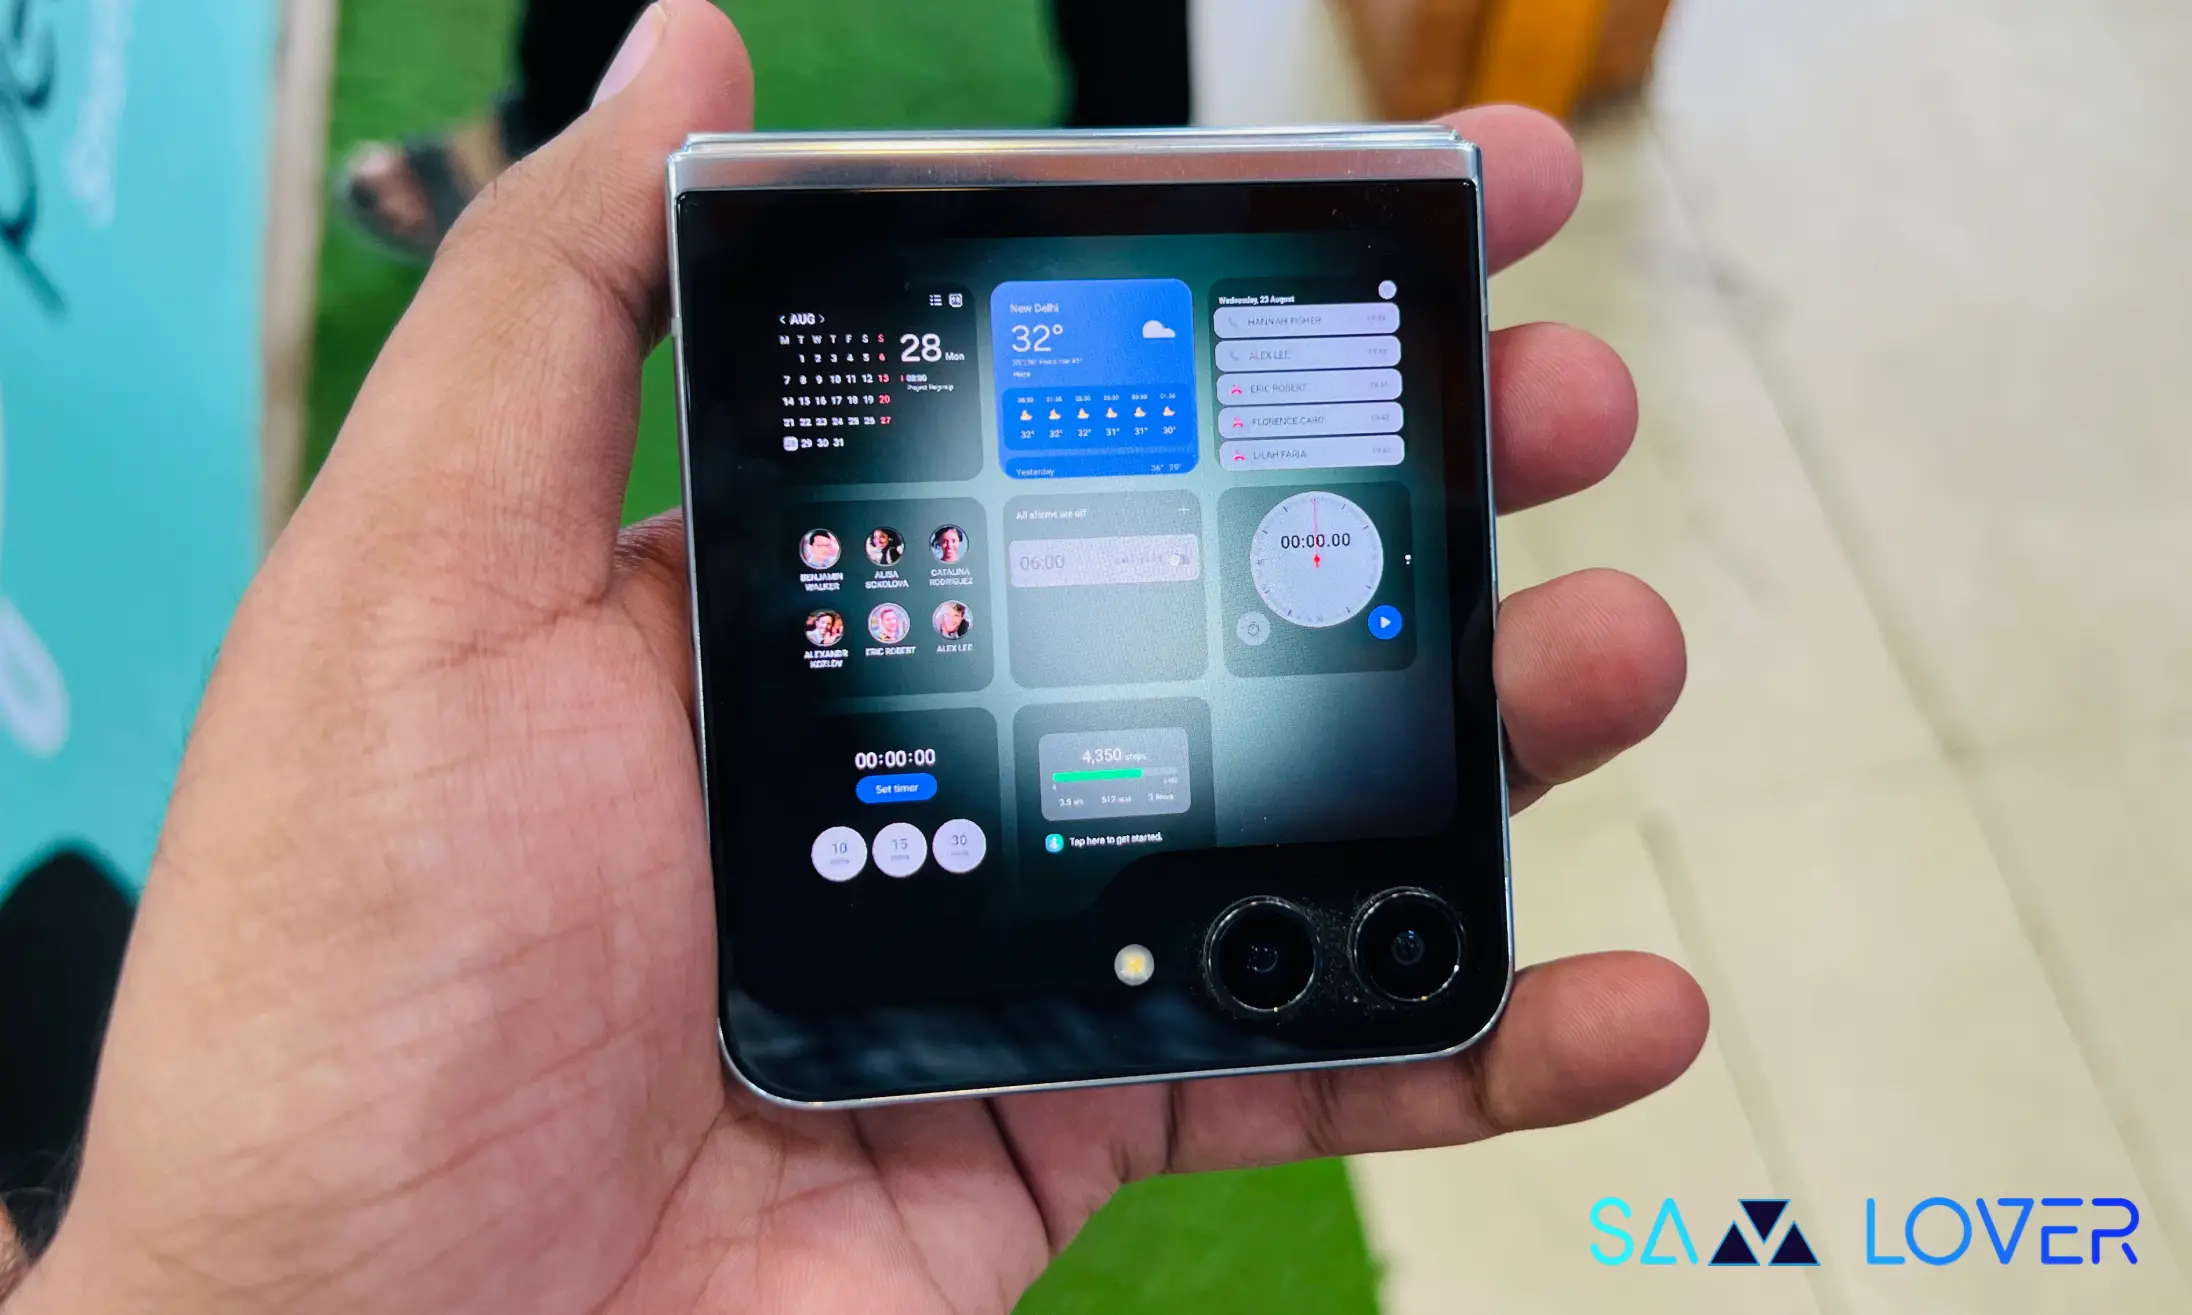
The Galaxy Z Flip 5 has a massive 3.4-inch cover screen, a handy feature. The cover screen offers weather, clock, calendar, and more information. It is highly customizable, and you can customize your Flip’s cover screen with just some excellent tips & tricks. Let’s have a look at how you can do that.

To entirely customize the cover screen:

Follow the instructions below:

  • Open your Flip 5 smartphone.
  • Head to the ‘Settings’
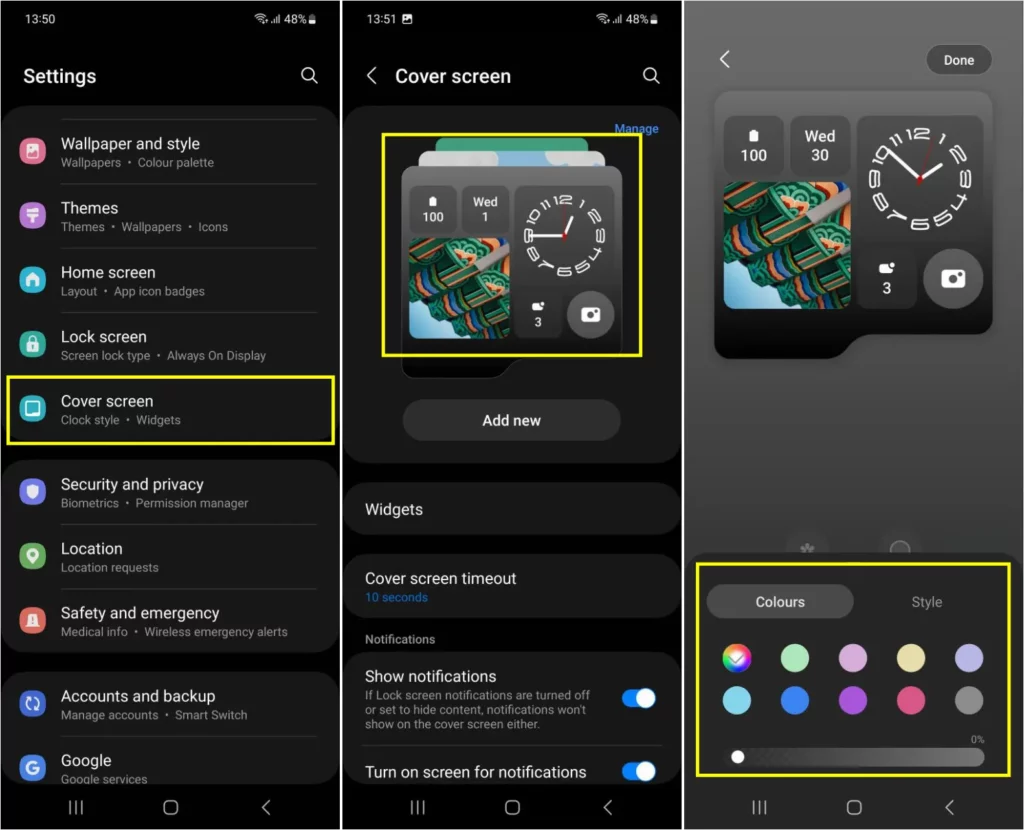
  • Scroll down and tap on the Cover screen tab.
  • Tap on the Preview of your Flip’s cover screen.
  • To change the background color of the cover screen, tap on the Color option.
  • Choose the color you like.
  • By moving the slider, you can set the transparency of the color of the cover screen.
  • Once done with selecting colors, tap Done.

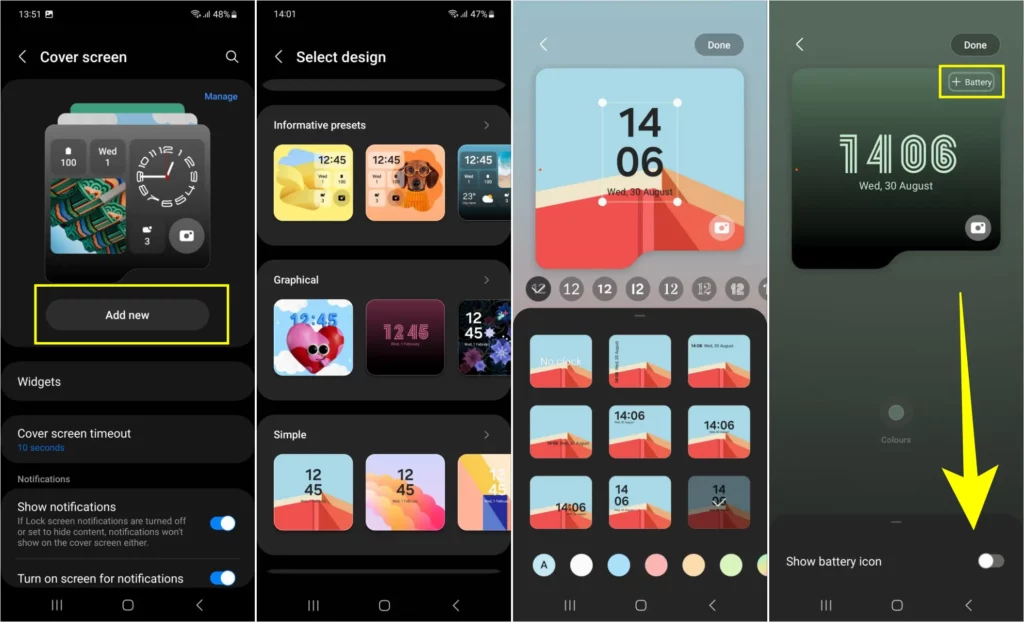
How to change the cover screen interface

  • On the cover screen option
  • Tap on Add new option
  • Scroll on to see which interface you like.
  • Choose any cover screen interface.
  • You can add Graphical frames or an Alphabetical frame on the interface by tapping on the Frames option.
  • Next, you can change the color of the frame by selecting either of the colors from the options provided.
  • Then, you can set the transparency level of the frame just by moving the slider.
  • Now, by tapping on the clock (Graphical Design), you can change the font style of the clock format.
  • By Scrolling down, you can find more options of different clock formats. You can choose any of them.
  • At last, you can change the color of the fonts of the clock (Simple Design).
  • Also, by tapping the Camera icon on the cover screen interface, you can add other apps such as Torch, calendar, weather, alarm, and more.
  • And on the top, by selecting the “+ Battery” option, you can add a Battery icon on your cover screen.
  • Once completed, Tap Done.

How to Manage Galaxy Z Flip 5 Cover Interface

  • Go to Settings
  • Scroll down and tab on Cover Screen
  • Tap on Manage on right corner
  • Now you can move or delete any interface as per your choice
  • Tab on Done on the top right corner button.

Now, you have an entirely customized cover screen, which you can customize the way you want.


Harsh is a seasoned technology enthusiast with a deep passion for Android. Since its announcement in 2007, he has closely followed the evolution of this operating system, gaining a comprehensive understanding of its features and capabilities. His background in Android, IT, and Journalism has equipped him with the skills to analyze and present complex technological concepts in a clear and engaging manner. As the Editor-in-Chief at Samlover.com, Harsh is dedicated to sharing his knowledge and experiences about Android, services, and applications with the world.

Guide

One UI 6.1: Must-Try Features That Make Your Galaxy Phone Even Better

Published

on


Samsung has brought several new features with the One UI 6.1 update. Despite the hype of some Galaxy AI features, other new changes did not come into the limelight, so in this article, we will discuss some of the useful functionalities that will provide you with a whole new experience of customization.

How to Use Samsung Galaxy AI Copy and paste the object Feature

With the One UI 6.1 update, users will get more convenience while placing the objects in the images; however, it is not limited to only one image, and you can also copy and paste the object from one image to another. To do that, follow these simple steps:

  1. Open the gallery, then tap and hold the object.
  2. Once it pops up, you can drag it to another image.
  3. Alternatively, you can see a copy option at the top of the object; just tap on it.
  4. Once done, go to the other image where you want to pass the image. 
  5. Then tap on and hold the empty place in the image, and tap on the paste button.

For more convenience, Samsung has also allowed users to paste the images to other Galaxy devices directly if they are working on the same Samsung account.

How to Use Samsung Galaxy AI Enhanced Lock screen customization

Galaxy users have several customization options that bring the ability to give a personal creative lock screen. Now with One UI 6.1, you will receive some new options like effects and frames. With the effects option, you can directly apply different effects to the photo and also select desired frames to apply the effects. To use the effects, follow the below steps.

  1. First, go to the gallery.
  2. Choose the desired image you want to use on the lock screen. 
  3. Once you choose the image, tap on the three-dot menu and select’set’image in lock screen.
  4. Then there will be an edit window where you will see two buttons at the bottom of the screen for effects and frames. 
  5. When you choose the frame option, you can also customize frames.

How to Use Galaxy AI Directly search the images on the internet with Circle

Samsung is the first company to introduce the circle-to-search feature on their devices. With normal usage, you can search any image that appears on your device, and you can also use it to immediately get information about any products by simply clicking photos with your camera.

Galaxy AI: How to use your voice for live text to call for translation

Now users can easily use the live text to call translation on their own by following these simple steps:

  1. Go to settings and select advanced features.
  2. Now tap on Advanced Intelligence.
  3. Here is the first option named “phone
  4. Now through the text call settings
  5. Here, you can customize the voice and apply your own.
  6. Now it will take some voice samples and feed them to a new file, which will create your own voice pack.

Continue Reading

Guide

How to Use Galaxy AI Summarize and Translate Feature on Samsung Phones

Published

on


If you like to read articles on the internet, you will love the Galaxy AI summarization feature, which will help you quickly read the main concept of the article and also take advantage of on-demand translation of the content into your language.

Initially, it looks like the feature may be available for all the browsers installed on Galaxy devices, but while exploring the feature, we got to know that you can take advantage of the summarization and translation abilities only from the Samsung Internet browser. Let’s learn about how to use the feature. 

Galaxy AI Summarize and Translate Feature on Samsung Internet Browser

The summarization and translation of web pages work as an assistant, which works on demand from users, so it suits the browsing assist function. When it arrived, it looked like a premium feature, so there were some rumors that it might be limited to the Galaxy S24 devices, but with the latest development, the expansion of One UI 6.1, the feature was spotted on all the flagship devices released last year.

How to use Galaxy AI Summarize and Translate feature

  1. First, open the Samsung Internet browser.
  2. then search for whatever you want to read. When the page loads, tap on the star icon (Galaxy AI icon) in the center of the toolbar.
  3. Now, pick one of two options. either summarize or translate and wait until it processes. If you want to take a more detailed summary, then you can select the Detailed option, or for a shorter summary, you can go for Standard. 
  4. After the summary, you can also translate the content into the desired language by tapping on the translate button.

It is worth noticing that the browsing assist doesn’t work on all the sites because some sites use paywalls that don’t give access to the AI. However, once you subscribe to the particular site, you can easily do the translation and summarization.


Continue Reading

Guide

Samsung One UI: How to Enable Swipe-Down Search On Galaxy Phone’s Home Screen

Published

on


Nowadays, every smartphone user generally uses hundreds of applications on their devices, and due to the large number of applications, it’s a bit difficult to find the desired application, so to make it simple, users have only one solution: manually search for the application with its name using the finder option.

Samsung Swipe Down To Access App Finder

Samsung has rolled out a new update for the Home Up application. With the latest update, users have received some useful features; Finder Access is one of them, which has made app access more convenient. It allows users to quickly jump to the app finder with one swipe. Let’s understand how you can use it.

How to Enable Samsung Home Screen App Finder with Good Lock Home Up

To use the App Finder, your Samsung Galaxy phone should support the Good Lock application and then you need to update the Home Up application to the latest version (v15.0.01.19), then follow the below steps:

  1. Go to the Good lock.
  2. Here, select the Home Up module.
  3. Turn on the Home Up
  4. Then tap on the Home screen option.
  5. Here, you will get the Finder access option, then tap on it. 
  6. Now choose any option from the “Home screen” or “App screen” where the feature should be activated.
  7. Now if you swipe down on the Home Screen to access App Finder.


Note: The latest update for Home Up is only available for Galaxy devices that are running on One UI 6.1 or above. And Swipe Down control centre won’t work after enable this feature.


Continue Reading