Guide
How To Send And Receive Messages On Your Galaxy Watch 5
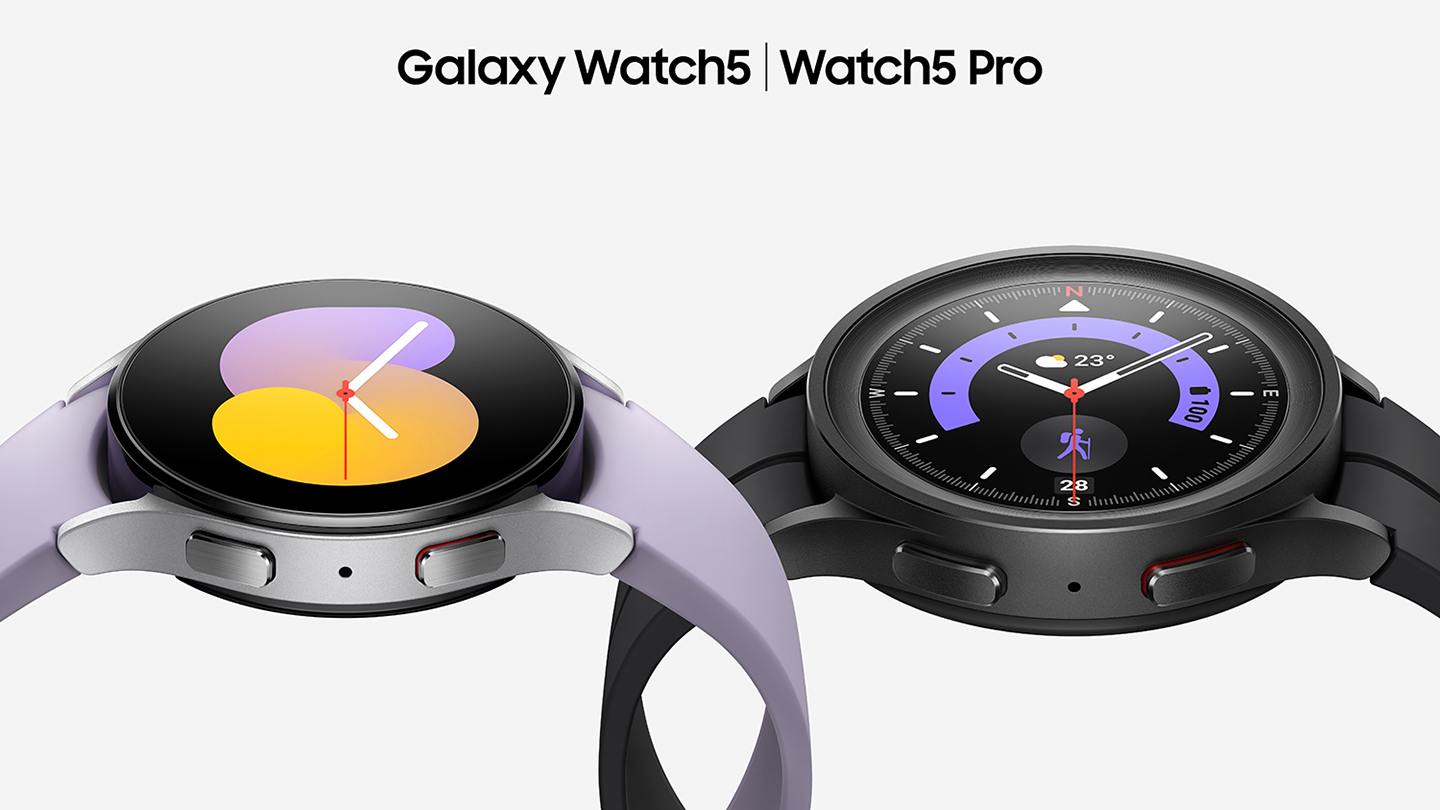
The Samsung Galaxy Watch 5 and Galaxy Watch 5 Pro make talking while you walk simpler than ever. Without ever pulling out your Galaxy smartphone, you can create new messages, check incoming messages, and reply using the preinstalled Messages app.
When you reject incoming calls or use Quick messages, you can also send answers. Unless the watch is an LTE variant with active network capabilities, you must link your watch to a Galaxy phone.
Keep In Mind:
Note 1: Available screens and settings may vary by wireless service provider, software version, and model. Third-party messaging apps like Google Hangout, WhatsApp, or Facebook Messenger cannot be installed on the watch.
Note 1: This function is only available when connected to a Galaxy phone. It is not available on non-Samsung phones or iOS devices.
If you want to take a break from your jog and send a Quick message to a friend, you can do that easily on your watch using the Messages app. Make sure your watch is connected to your phone or to a mobile network.
How to send and receive messages on your Galaxy Watch 5
- Navigate to and tap Messages.
- To compose a new message, select either the message icon or the contact icon.
- Note: The message icon may not appear if you’ve never sent a message on the watch before.
- Enter or choose your recipient.
- If you want to send a reply to an existing conversation, Select the message from the log instead.
- There are many methods to choose from when it comes to creating or replying to a text.
- Just swipe down to see the following options:
- Microphone: Speak into your watch and have it converted to text.
- Voice recording: Record your voice as an audio file and send it to a recepient. This option is only available on the Galaxy Watch5 series.
- Emoji: Select an emoji as your response.
- Write: Write letters on the watch face. Written letters will be converted into text.
- Keyboard: Type out your response using the watch’s T9 keyboard.
- Quick response: Select a Quick message to send as your response.
- Reply on phone: Send the conversation to the Messages app on your connected phone and then reply using your phone’s keyboard. You can be required to unlock your phone first if you have a Lock screen.
- Edit responses: Create or edit Quick messages by writing letters on the watch face. Just like with text input, written letters will be converted into text.
- Note: On the Galaxy Watch5 series, Quick messages can only be edited through the Galaxy Wearable app.
- Doodle: Write letters on the watch face. Written letters will be sent as an image. This option is not available on the Galaxy Watch5 series.
Guide
Samsung One UI: How to Enable Swipe-Down Search On Galaxy Phone’s Home Screen
Nowadays, every smartphone user generally uses hundreds of applications on their devices, and due to the large number of applications, it’s a bit difficult to find the desired application, so to make it simple, users have only one solution: manually search for the application with its name using the finder option.
Samsung Swipe Down To Access App Finder
Samsung has rolled out a new update for the Home Up application. With the latest update, users have received some useful features; Finder Access is one of them, which has made app access more convenient. It allows users to quickly jump to the app finder with one swipe. Let’s understand how you can use it.
How to Enable Samsung Home Screen App Finder with Good Lock Home Up
To use the App Finder, your Samsung Galaxy phone should support the Good Lock application and then you need to update the Home Up application to the latest version (v15.0.01.19), then follow the below steps:
- Go to the Good lock.
- Here, select the Home Up module.
- Turn on the Home Up
- Then tap on the Home screen option.
- Here, you will get the Finder access option, then tap on it.
- Now choose any option from the “Home screen” or “App screen” where the feature should be activated.
- Now if you swipe down on the Home Screen to access App Finder.
Note: The latest update for Home Up is only available for Galaxy devices that are running on One UI 6.1 or above. And Swipe Down control centre won’t work after enable this feature.
Guide
Galaxy AI: How to Summarize & Transcribe Voice Recording into Text on Samsung Phone
Samsung has recently rolled out the One UI 6.1 update for several Galaxy devices. With the late One UI update, the company has brought several innovations that will provide several utility options for the users. From several features, the AI power ones are the most highlighted, and voice record summarization is also a unique feature.
What is voice recording summarization?
Now, with the One UI 6.1 update, Galaxy users can easily transcribe any voice recording into text form and summarize it in their own language. This will help users easily make notes according to what is recorded.
To use this feature, you need to go to the settings and then select the Advanced feature. Here you will see the voice recorder, tap on it, and then touch the summaries option. Now turn it on. When it is turned on, you can enjoy summarizing voice recordings.
To summarize the voice recording Go to the recorder application, select the desired recording file, and here you will see the option ‘transcribe’. Once it finishes transcribing, you will see one more tab for summarization. However, the option is currently not working correctly as it fails to detect the exact wording of other languages except English. However, it is expected that the company may bring more optimization to the device to make the feature more powerful.
How to Transcribe Voice Recording into Text on Samsung Phones
If you are using a Galaxy device that has installed the One UI 6.1 update, then you can easily use voice recorder summarization by following these steps:
- Go to the Settings and select the advanced feature.
- Here you will see a voice recorder option. Tap on it to access
- Now turn the toggle on to activate it.
- Once activated, open the voice recorder, then select any saved file.
- Now you will see the option “transcribe.” It will provide all the information from the test.
- Once the transcription is done, you will get a summarize tab adjacent to it; just swipe write to access it.
Guide
Samsung One UI: How to Manage Always-on Display (AOD) Brightness after One UI 6.1
Samsung has introduced some new utilities with One UI 6.1 for the AOD display. Users who own the Galaxy S24 can put wallpaper in the Always on display and add some widgets as well; however, the company has removed the manual brightness settings for the same feature. But you don’t have to worry, as you can still manage the always-on-display brightness with new methods.
How to manage AOD brightness for Galaxy S24 series
With the latest One UI 6.1, Samsung has removed the manual brightness settings for the Galaxy S24 devices. If you want to adjust the auto brightness, you have to set the preferred brightness level of the main display from the notification panel. The reason behind the removal of the feature is to give convenience to users, as it brings automation for brightness by default, so it will dim or increase the brightness of the AOD according to the light condition.
How to Manage AOD Brightness after One UI 6.1 update
Apart from Galaxy S24 devices, Samsung has placed the AOD manual control option in the Good Lock – LockStar App settings, so if you want to take advantage of the manual control settings, first you need to update the Lockstar application to the latest version, then follow the below steps:
- Open the Good Lock on your device’
- Then tap on the LockStar module from the list of “Makeup” modules.
- Here you will see the option Always On Display Auto Brightness.
- If you don’t see the manual brightness control, then turn the auto brightness off.
- Then you will get a dedicated slider so you can set the brightness to a different level.