Connect with us

Guide

Samsung One UI: How to use Galaxy AI Note Assistant Feature

Published

on

Samsung Notes

Samsung has brought several new features that have brought convenience for using different existing functions of the Galaxy devices. From all those significant features, we will talk about the Note Assist feature, which Galaxy AI powers. Before we know how to use it, let’s understand it.

As the name suggests, Note Assist assists in managing the content in the Note application. In other words, whatever you save in Note, you can now arrange the content in proper form. To do that, the Galaxy AI has integrated dedicated features like auto-formatting, summarization, and many more. Let’s know how to use it. 

How do to use the Galaxy AI Note Assist on Samsung?

To use the Note assist, you need to follow the below steps:

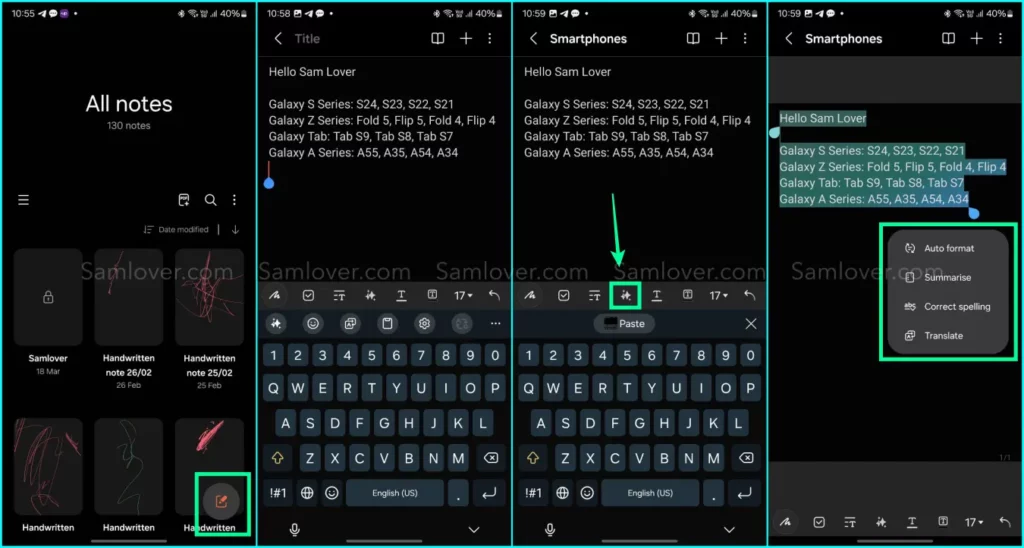
  1. First, go to the Note application. 
  2. Tap on the Create icon. 
  3. Write your notes with either a keyboard or a pen.
  4. Then tap on the Note assist icon above the keyboard.
  5. It will pop up four options, including auto-format, summarize, correct spelling, or translate.
How to use Galaxy AI Note Assistant

Auto format: with the auto format function, you will get the ability to arrange the container in proper format with a single tap. It will provide two options that will help YouTube easily format all the content and apply the “header and bullets” and “meeting notes.”.

Summarize: When you tap on the Ummarize function, it analyzes the content of your notes and produces a condensed version that contains all the key information. It will work on the content, which has at least 200 characters. You can also copy or add a summarized note to the existing note or a new note. Additionally, you can replace the original note with the summarized text.

Correct spelling: As the name suggests, the correct spelling function simply identifies and revises spelling and punctuation errors with your notes. 

Translate: With this option, you can easily translate your notes from one language to another. As per the information, there are 13 languages supported, and it is expected that more languages will be added in future updates.


Hello, I'm Raghav a part-time writer of Samlover. Curiosity coursing through my veins, I'm a knowledge junkie with a knack for explaining the complex in ways that make sense (even if it takes a few extra words). Don't be fooled by the big headphones and ebook reader facade - I might disappear into worlds of words and ideas, but Doubt, my ever-vigilant canine companion, keeps me grounded. He's the furry alarm clock that drags me to the park twice a day, reminding me that the real world exists beyond the pages and podcasts. So, forgive the occasional long-winded post – consider it a side effect of an insatiable mind fueled by a love for learning and a loyal mutt who ensures I never get lost in the labyrinth of knowledge.

Guide

Samsung One UI: How to Enable Swipe-Down Search On Galaxy Phone’s Home Screen

Published

on


Nowadays, every smartphone user generally uses hundreds of applications on their devices, and due to the large number of applications, it’s a bit difficult to find the desired application, so to make it simple, users have only one solution: manually search for the application with its name using the finder option.

Samsung Swipe Down To Access App Finder

Samsung has rolled out a new update for the Home Up application. With the latest update, users have received some useful features; Finder Access is one of them, which has made app access more convenient. It allows users to quickly jump to the app finder with one swipe. Let’s understand how you can use it.

How to Enable Samsung Home Screen App Finder with Good Lock Home Up

To use the App Finder, your Samsung Galaxy phone should support the Good Lock application and then you need to update the Home Up application to the latest version (v15.0.01.19), then follow the below steps:

  1. Go to the Good lock.
  2. Here, select the Home Up module.
  3. Turn on the Home Up
  4. Then tap on the Home screen option.
  5. Here, you will get the Finder access option, then tap on it. 
  6. Now choose any option from the “Home screen” or “App screen” where the feature should be activated.
  7. Now if you swipe down on the Home Screen to access App Finder.


Note: The latest update for Home Up is only available for Galaxy devices that are running on One UI 6.1 or above. And Swipe Down control centre won’t work after enable this feature.


Continue Reading

Guide

Galaxy AI: How to Summarize & Transcribe Voice Recording into Text on Samsung Phone

Published

on


Samsung has recently rolled out the One UI 6.1 update for several Galaxy devices. With the late One UI update, the company has brought several innovations that will provide several utility options for the users. From several features, the AI power ones are the most highlighted, and voice record summarization is also a unique feature.

What is voice recording summarization?

Now, with the One UI 6.1 update, Galaxy users can easily transcribe any voice recording into text form and summarize it in their own language. This will help users easily make notes according to what is recorded. 

To use this feature, you need to go to the settings and then select the Advanced feature. Here you will see the voice recorder, tap on it, and then touch the summaries option. Now turn it on. When it is turned on, you can enjoy summarizing voice recordings.

To summarize the voice recording Go to the recorder application, select the desired recording file, and here you will see the option ‘transcribe’. Once it finishes transcribing, you will see one more tab for summarization. However, the option is currently not working correctly as it fails to detect the exact wording of other languages except English. However, it is expected that the company may bring more optimization to the device to make the feature more powerful.

How to Transcribe Voice Recording into Text on Samsung Phones

If you are using a Galaxy device that has installed the One UI 6.1 update, then you can easily use voice recorder summarization by following these steps:

  1. Go to the Settings and select the advanced feature.
  2. Here you will see a voice recorder option. Tap on it to access
  3. Now turn the toggle on to activate it.
  1. Once activated, open the voice recorder, then select any saved file.
  2. Now you will see the option “transcribe.”  It will provide all the information from the test. 
  3. Once the transcription is done, you will get a summarize tab adjacent to it; just swipe write to access it. 

Continue Reading

Guide

Samsung One UI: How to Manage Always-on Display (AOD) Brightness after One UI 6.1

Published

on


Samsung has introduced some new utilities with One UI 6.1 for the AOD display. Users who own the Galaxy S24 can put wallpaper in the Always on display and add some widgets as well; however, the company has removed the manual brightness settings for the same feature. But you don’t have to worry, as you can still manage the always-on-display brightness with new methods. 

How to manage AOD brightness for Galaxy S24 series

With the latest One UI 6.1, Samsung has removed the manual brightness settings for the Galaxy S24 devices. If you want to adjust the auto brightness, you have to set the preferred brightness level of the main display from the notification panel. The reason behind the removal of the feature is to give convenience to users, as it brings automation for brightness by default, so it will dim or increase the brightness of the AOD according to the light condition. 

How to Manage AOD Brightness after One UI 6.1 update 

Apart from Galaxy S24 devices, Samsung has placed the AOD manual control option in the Good Lock – LockStar App settings, so if you want to take advantage of the manual control settings, first you need to update the Lockstar application to the latest version, then follow the below steps:

  1. Open the Good Lock on your device’
  2. Then tap on the LockStar module from the list of “Makeup” modules.
  3. Here you will see the option  Always On Display Auto Brightness. 
  4. If you don’t see the manual brightness control, then turn the auto brightness off.
  5. Then you will get a dedicated slider so you can set the brightness to a different level.

Continue Reading