Connect with us

Guide

How To Customize Galaxy Z Fold 5 Edge Panel

Published

on


Samsung always ensures effective modifications with enhancements for each technology innovation, as with the Galaxy Z Fold 5 Edge panels. Edge panels have undergone some interesting enhancements since its evolution. As of now, numerous other Android brands have adopted the intuitive functionality of Edge panels for their smartphones and learned about the edge panels’ convenience. 

The Galaxy Z Fold 5 Edge Panel:

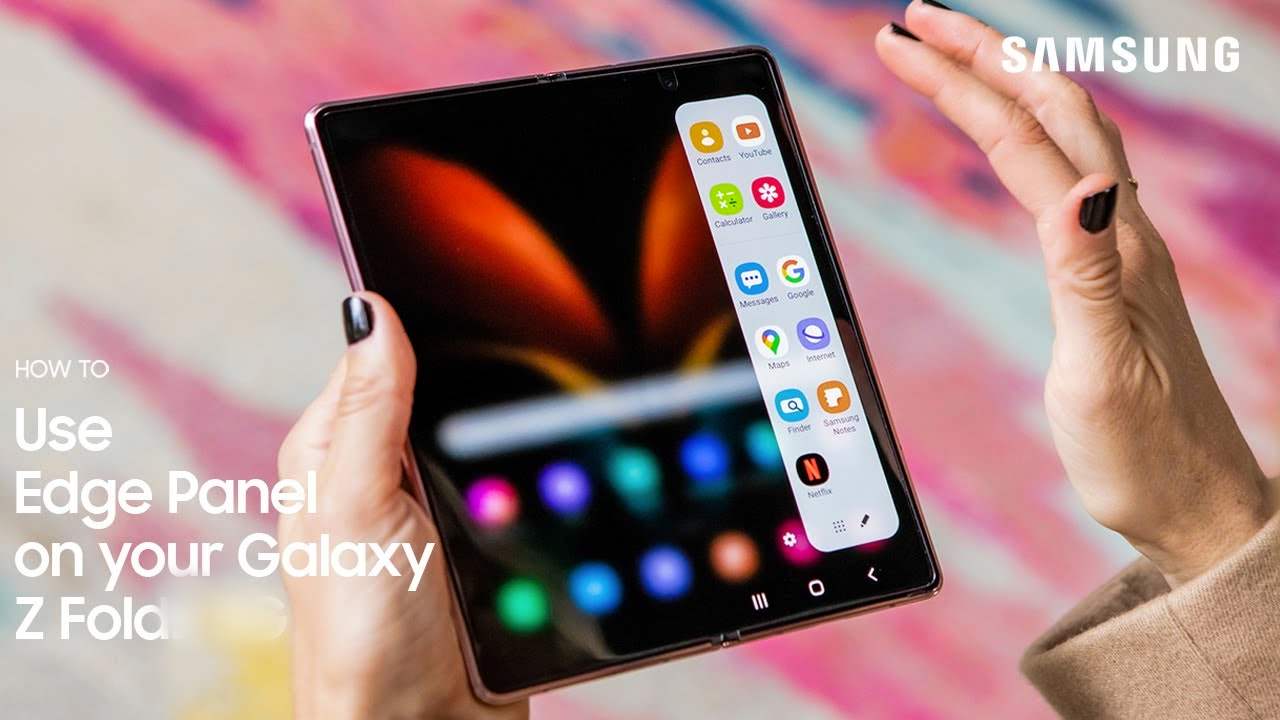
We use a lot of applications and functionalities on our smartphones, and sometimes, it is difficult to find the right app or feature when needed. Edge Panel is one of the most helpful functionality of Galaxy devices that allows users to quickly access any app or other important feature of the smartphone without wasting time. In other words, this feature helps you to access your favorite apps quickly.

Meanwhile, if you own a Galaxy Z Fold 5, you need to be aware of some of its stunning features to use the device to its full potential. One such functionality is customizing edge panels. Here is a quick guide that can help you customize the edge panels of your Galaxy Z Fold 5 smartphone.

Customize the Edge panel of Galaxy Z Fold 5:

To those unaware, there are already some pre-installed edge panels on your Galaxy Z Fold 5 smartphone, which can be used to quickly open your recently used applications, texting, weather, calendar, and more. You can add or remove it based on your liking.

How do you add & remove the apps from the Galaxy Z Fold 5 edge panel?

  • To open the Menu, Swipe left on the Edge Panel Handle, which is the grey tab on the right side of your screen.
  • Now tap on the Settings icon.
  • Select or deselect the edge panel you want to add or remove. Note that you can select up to 10 edge panels. 

How to edit apps in Galaxy Z Fold 5 edge panel?

Here, you can add those apps that you use the most.

  • To open the edge panel, Swipe left.
  • Tap on the Settings icon.
  • To start customizing it, tap Edit below the app’s edge panel. Note that the Edit option may only appear when selecting the edge panel.
  • The list of your device’s apps will appear on the screen on the left. Here, choose the app you want to add to the edge panel. You can add 10+ apps. If you see an app’s icon is grey, you will not be able to add that app on the edge panel.
  • To delete an app from your edge panel, tap on the Red Minus icon next to it. Plus, you can press and hold the app and drag the apps to change their order.
  • Note that if any app is greyed out, you can’t drag the app to a new position.
  • In the Edit menu, click on the three vertical dots icon. Then press the switch next to the Show recent apps to turn this feature on/off.

How to download new edge panels?

Whether you want Google Maps for direction or calendar for marking the important dates, there are panels for every situation, which you can get from the Galaxy Store:

  • To open the Menu, swipe left on the edge panel handle. 
  • Then, Tap on the Settings icon, which is at the left of the edge panel.
  • Select the Galaxy Store.
  • Here choose the edge panel app which you want to download and follow the on-screen prompts to complete the download process.

How to take selfie form Galaxy Z Fold 5 main camera

Samsung Galaxy Z Fold 5 Display Gets a Secret Upgrade


Harsh is a seasoned technology enthusiast with a deep passion for Android. Since its announcement in 2007, he has closely followed the evolution of this operating system, gaining a comprehensive understanding of its features and capabilities. His background in Android, IT, and Journalism has equipped him with the skills to analyze and present complex technological concepts in a clear and engaging manner. As the Editor-in-Chief at Samlover.com, Harsh is dedicated to sharing his knowledge and experiences about Android, services, and applications with the world.

Guide

Samsung One UI: How to Enable Swipe-Down Search On Galaxy Phone’s Home Screen

Published

on


Nowadays, every smartphone user generally uses hundreds of applications on their devices, and due to the large number of applications, it’s a bit difficult to find the desired application, so to make it simple, users have only one solution: manually search for the application with its name using the finder option.

Samsung Swipe Down To Access App Finder

Samsung has rolled out a new update for the Home Up application. With the latest update, users have received some useful features; Finder Access is one of them, which has made app access more convenient. It allows users to quickly jump to the app finder with one swipe. Let’s understand how you can use it.

How to Enable Samsung Home Screen App Finder with Good Lock Home Up

To use the App Finder, your Samsung Galaxy phone should support the Good Lock application and then you need to update the Home Up application to the latest version (v15.0.01.19), then follow the below steps:

  1. Go to the Good lock.
  2. Here, select the Home Up module.
  3. Turn on the Home Up
  4. Then tap on the Home screen option.
  5. Here, you will get the Finder access option, then tap on it. 
  6. Now choose any option from the “Home screen” or “App screen” where the feature should be activated.
  7. Now if you swipe down on the Home Screen to access App Finder.


Note: The latest update for Home Up is only available for Galaxy devices that are running on One UI 6.1 or above. And Swipe Down control centre won’t work after enable this feature.


Continue Reading

Guide

Galaxy AI: How to Summarize & Transcribe Voice Recording into Text on Samsung Phone

Published

on


Samsung has recently rolled out the One UI 6.1 update for several Galaxy devices. With the late One UI update, the company has brought several innovations that will provide several utility options for the users. From several features, the AI power ones are the most highlighted, and voice record summarization is also a unique feature.

What is voice recording summarization?

Now, with the One UI 6.1 update, Galaxy users can easily transcribe any voice recording into text form and summarize it in their own language. This will help users easily make notes according to what is recorded. 

To use this feature, you need to go to the settings and then select the Advanced feature. Here you will see the voice recorder, tap on it, and then touch the summaries option. Now turn it on. When it is turned on, you can enjoy summarizing voice recordings.

To summarize the voice recording Go to the recorder application, select the desired recording file, and here you will see the option ‘transcribe’. Once it finishes transcribing, you will see one more tab for summarization. However, the option is currently not working correctly as it fails to detect the exact wording of other languages except English. However, it is expected that the company may bring more optimization to the device to make the feature more powerful.

How to Transcribe Voice Recording into Text on Samsung Phones

If you are using a Galaxy device that has installed the One UI 6.1 update, then you can easily use voice recorder summarization by following these steps:

  1. Go to the Settings and select the advanced feature.
  2. Here you will see a voice recorder option. Tap on it to access
  3. Now turn the toggle on to activate it.
  1. Once activated, open the voice recorder, then select any saved file.
  2. Now you will see the option “transcribe.”  It will provide all the information from the test. 
  3. Once the transcription is done, you will get a summarize tab adjacent to it; just swipe write to access it. 

Continue Reading

Guide

Samsung One UI: How to Manage Always-on Display (AOD) Brightness after One UI 6.1

Published

on


Samsung has introduced some new utilities with One UI 6.1 for the AOD display. Users who own the Galaxy S24 can put wallpaper in the Always on display and add some widgets as well; however, the company has removed the manual brightness settings for the same feature. But you don’t have to worry, as you can still manage the always-on-display brightness with new methods. 

How to manage AOD brightness for Galaxy S24 series

With the latest One UI 6.1, Samsung has removed the manual brightness settings for the Galaxy S24 devices. If you want to adjust the auto brightness, you have to set the preferred brightness level of the main display from the notification panel. The reason behind the removal of the feature is to give convenience to users, as it brings automation for brightness by default, so it will dim or increase the brightness of the AOD according to the light condition. 

How to Manage AOD Brightness after One UI 6.1 update 

Apart from Galaxy S24 devices, Samsung has placed the AOD manual control option in the Good Lock – LockStar App settings, so if you want to take advantage of the manual control settings, first you need to update the Lockstar application to the latest version, then follow the below steps:

  1. Open the Good Lock on your device’
  2. Then tap on the LockStar module from the list of “Makeup” modules.
  3. Here you will see the option  Always On Display Auto Brightness. 
  4. If you don’t see the manual brightness control, then turn the auto brightness off.
  5. Then you will get a dedicated slider so you can set the brightness to a different level.

Continue Reading